

| 일 | 월 | 화 | 수 | 목 | 금 | 토 |
|---|---|---|---|---|---|---|
| 1 | 2 | 3 | 4 | 5 | ||
| 6 | 7 | 8 | 9 | 10 | 11 | 12 |
| 13 | 14 | 15 | 16 | 17 | 18 | 19 |
| 20 | 21 | 22 | 23 | 24 | 25 | 26 |
| 27 | 28 | 29 | 30 |
- 컨트렉트 배포 자동화
- 티스토리챌린지
- ethers
- ethers websocket
- ethers v6
- 스마트 컨트렉트 함수이름 중복
- ambiguous function description
- Vue.js
- erc4337
- 컨트렉트 동일한 함수이름 호출
- 러스트 기초
- Vue
- 러스트기초
- 스마트컨트렉트 예약어 함수이름 중복
- SBT표준
- ethers typescript
- 스마트컨트렉트 함수이름 중복 호출
- ethers type
- chainlink 설명
- 계정추상화
- git rebase
- vue기초
- 러스트 기초 학습
- rust 기초
- 머신러닝기초
- 스마트컨트렉트테스트
- erc4337 contract
- 오블완
- 체인의정석
- multicall
- Today
- Total
체인의정석
Go 언어로 메타 마스크 로그인 로직, Signature 검증 (백엔드) 본문
Go-ethereum 모듈 설치
서명 검증 로직에서는 고 이더리움 모듈이 필요한다. 안정적인 버전을 설치하지 않으면 다음 에러가 발생한다.
 go get github.com/ethereum/go-ethereum@latest

go: downloading github.com/ethereum/go-ethereum v1.15.7
go: github.com/ethereum/go-ethereum@latest: github.com/ethereum/go-ethereum@v1.15.7: verifying module: checksum mismatch
        downloaded: h1:MnmJgaVD1LcBd4m6WJnMpLWhl5t5v4yI6zMBwvNv+ic=
        sum.golang.org: h1:vm1XXruZVnqtODBgqFaTclzP0xAvCvQIDKyFNUA1JpY=

SECURITY ERROR
This download does NOT match the one reported by the checksum server.
The bits may have been replaced on the origin server, or an attacker may
have intercepted the download attempt.

For more information, see 'go help module-auth'.
이에 따라서 버전을 명시하고 설치하였다.
go get github.com/ethereum/go-ethereum@v1.15.6

go: downloading github.com/ethereum/go-ethereum v1.15.6
go: downloading github.com/ethereum/go-verkle v0.2.2
go: downloading github.com/crate-crypto/go-kzg-4844 v1.1.0
go: downloading github.com/ethereum/c-kzg-4844 v1.0.0
go: downloading github.com/consensys/gnark-crypto v0.14.0
go: downloading github.com/crate-crypto/go-ipa v0.0.0-20240724233137-53bbb0ceb27a
go: downloading github.com/supranational/blst v0.3.14
go: downloading github.com/consensys/bavard v0.1.22
go: downloading github.com/bits-and-blooms/bitset v1.17.0
go: downloading golang.org/x/net v0.36.0
go: upgraded github.com/ethereum/go-ethereum v1.15.3 => v1.15.6
go: upgraded github.com/goccy/go-json v0.10.2 => v0.10.4
go: upgraded golang.org/x/net v0.35.0 => v0.36.0
Go 에서 서명 utils 만들기
다음과 같이 utils를 통해서 서명 로직 만들기. 총 3개의 값을 받아서 서명 검증을 해주면 된다. utils에서는 에러 로그를 따로 남기지 않았으며 utils를 사용하는 handler에서 처리하였다.
package utils

import (
	"fmt"
	"github.com/ethereum/go-ethereum/common"
	"github.com/ethereum/go-ethereum/crypto"
)

// VerifySignature verifies an Ethereum signature against the provided message and address.
// 메시지, 서명(hex), 이더리움 주소를 입력받아 서명이 유효한지 검증합니다.
func VerifySignature(message string, sigHex string, address string) (bool, error) {
	// 1. 이더리움 표준 서명 메시지 포맷 적용
	// 서명된 메시지는 "\x19Ethereum Signed Message:\n" + 메시지 길이 + 메시지 본문 으로 구성되어야 함
	msg := []byte(fmt.Sprintf("\x19Ethereum Signed Message:\n%d%s", len(message), message))
	msgHash := crypto.Keccak256Hash(msg) // 메시지를 keccak256으로 해싱

	// 2. 서명 디코딩 (hex → byte slice)
	sig := common.FromHex(sigHex)
	if len(sig) != 65 {
		return false, fmt.Errorf("invalid signature length: expected 65 bytes")
	}

	// 3. V값 조정 (복구 ID)
	// 서명 마지막 바이트(sig[64])는 V 값 (27 또는 28)
	// go-ethereum은 0 또는 1만 허용하므로 27/28 → 0/1로 정규화
	if sig[64] != 27 && sig[64] != 28 {
		return false, fmt.Errorf("invalid recovery ID (expected 27 or 28)")
	}
	sig[64] -= 27

	// 4. 서명으로 퍼블릭키 복원
	pubKey, err := crypto.SigToPub(msgHash.Bytes(), sig)
	if err != nil {
		return false, fmt.Errorf("failed to recover public key: %w", err)
	}

	// 5. 퍼블릭키로부터 이더리움 주소를 계산한 뒤, 입력된 주소와 비교
	recoveredAddr := crypto.PubkeyToAddress(*pubKey)
	match := recoveredAddr.Hex() == common.HexToAddress(address).Hex()

	return match, nil
}
서명 로직 중간에 체크하는 부분의 경우 이해를 위해서 다음 설명을 참고하였다.
이더리움 서명은 R, S, V 이렇게 세 개로 구성됩니다:
| R | 32 bytes | 서명의 첫 번째 값 |
| S | 32 bytes | 서명의 두 번째 값 |
| V | 1 byte | 복구 ID (퍼블릭키 복원 시 사용) |
🔐 Recovery ID란?
📌 기본 개념
- ECDSA (Elliptic Curve Digital Signature Algorithm)는 서명 검증은 가능하지만, 서명만으로 퍼블릭 키를 직접 복원하는 기능은 기본적으로 없습니다.
- 하지만 이더리움은 ecrecover라는 기능을 제공하여, 서명으로부터 서명한 지갑의 퍼블릭 키 (→ 주소) 를 추정합니다.
- 이걸 위해선 서명된 메시지와 r, s 값 외에 추가 정보가 필요한데, 그게 바로 Recovery ID (v) 입니다.
✨ Recovery ID의 위치
- 이더리움에서 서명은 65바이트입니다:
-
서명 = [r(32 bytes)] + [s(32 bytes)] + [v(1 byte)]
- 여기서 v는 Recovery ID입니다.
- 보통 27 또는 28로 표현되며, 라이브러리마다 0, 1일 수도 있음.
- 따라서 Go에서는 v 값이 27/28이면 → 0/1로 변환해야 합니다
- sig[64]는 V 값입니다.
- 지갑은 27 or 28을 줍니다.
- crypto.SigToPub()은 0 or 1만 받습니다.
- 그래서 sig[64] -= 27 해서 변환해주는 거예요!
이를 이용한 handler 부분은 다음과 같이 구현이 가능하다. get 요청을 사용하였으며 값은 각각 받아오지만, ShouldBindQuery를 통해서 유효한 값인지 체크를 하는 로직을 넣어두었다.
// GetSigValidResult
// @Summary Verify Ethereum signature
// @Description 입력한 메시지, 주소, 서명 값을 검증하여 유효 여부를 반환합니다.
// @Tags signature
// @Accept  json
// @Produce  json
// @Param message query string true "검증할 원본 메시지"
// @Param address query string true "서명자의 Ethereum 주소"
// @Param signature query string true "서명 값 (hex)"
// @Success 200 {object} protocol.GetSigValidResultResponse
// @Failure 500 {object} protocol.RespHeader
// @Router /v1/users/verify_signature [get]
func (a *{logger를 상속받은 데이터베이스 기준 controller이름}) GetSigValidResult(c *gin.Context) {
	var req protocol.SignatureVerifyRequest

	if err := c.ShouldBindQuery(&req); err != nil {
		a.log.Errorf("Invalid signature verify request: %v", err)
		utils.RespError(c, http.StatusBadRequest, "invalid query params")
		return
	}

	valid, err := utils.VerifySignature(req.Message, req.Signature, req.Address)
	if err != nil || !valid {
		a.log.Errorf("Signature validation failed: %v", err)
		utils.RespError(c, http.StatusInternalServerError, "invalid signature")
		return
	}

	utils.RespOK(c, protocol.GetSigValidResultResponse{
		RespHeader: protocol.NewRespHeader(protocol.Success),
		IsValid:    true,
	})
}
참고로 요청, 응답 값은 따로 protocol에 분리해서 정의해 두었다.
type GetSigValidResultResponse struct {
	*RespHeader
	IsValid bool `json:"is_valid"`
}

// SignatureVerifyRequest - 서명 검증용 요청 바디 구조
type SignatureVerifyRequest struct {
	Message   string `form:"message" binding:"required"`
	Address   string `form:"address" binding:"required"`
	Signature string `form:"signature" binding:"required"`
}
서명로직 테스트 하기
swagger가 설정이 되었다면 서명 로직 검증의 input값을 UI상에서 받아와서 테스트 해 보려면 다음과 같이 진행하면 된다.
https://docs.metamask.io/wallet/reference/json-rpc-methods/personal_sign/
MetaMask developer documentation
docs.metamask.io
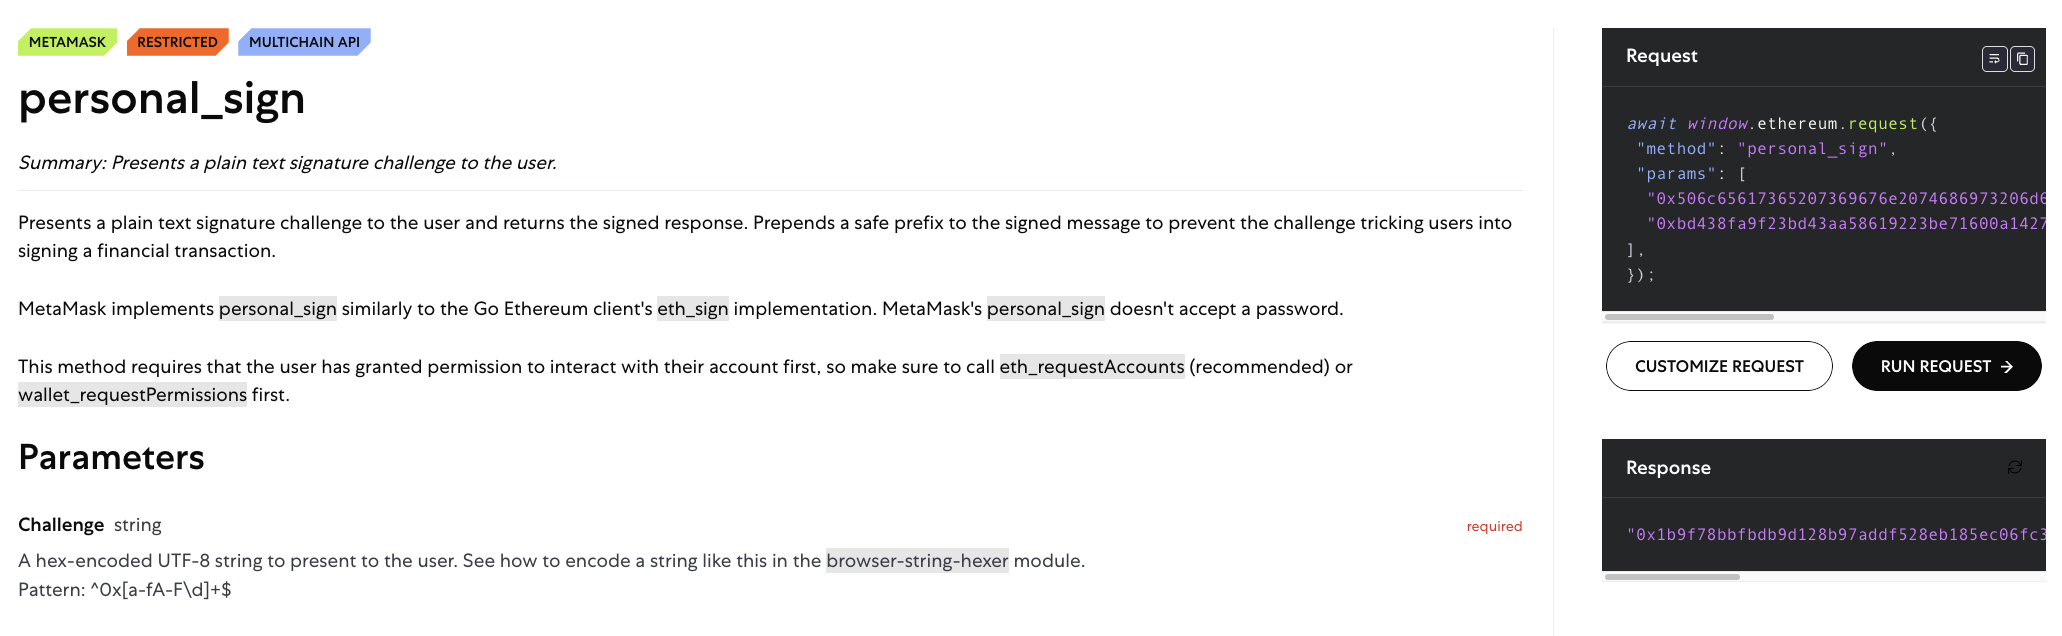
위의 페이지에서 서명 종류를 선택하고 우측에서 Run Request 버늩을 누른다.
그렇게 되면 메타마스크 서명 화면에 메세지가 뜨는데
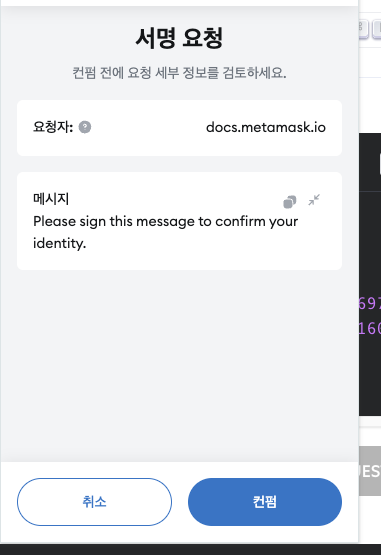
이런식으로 메세지가 나오게 되고
해당 부분을 message로 두고 Response에 새로 나온 값을 signature로 두고 서명한 지갑 주소를 address로 두고 swagger에서 검증하면 검증로직을 체크할 수 있다.
'개발 > backend(go)' 카테고리의 다른 글
| Go) JWT 발급 및 인증 로직 (백엔드) (0) | 2025.04.10 |
|---|---|
| MongoDB+Go 에서의 Cursor를 활용한 다중 데이터 조회 (select all) (0) | 2025.04.08 |
| Go Swagger, 패키지 관리, hash 함수 (1) | 2025.04.08 |
| Go 프로젝트 시작시 세팅해야할 것들 (git 코드 위치, Go land 기본설정, private 모듈, go 버전 변경) (0) | 2025.04.04 |

