| 일 | 월 | 화 | 수 | 목 | 금 | 토 |
|---|---|---|---|---|---|---|
| 1 | 2 | 3 | 4 | 5 | 6 | 7 |
| 8 | 9 | 10 | 11 | 12 | 13 | 14 |
| 15 | 16 | 17 | 18 | 19 | 20 | 21 |
| 22 | 23 | 24 | 25 | 26 | 27 | 28 |
- cloud hsm 서명
- SBT표준
- 스마트컨트렉트 함수이름 중복 호출
- ethers websocket
- git rebase
- 오블완
- Vue.js
- redux toolkit 설명
- 체인의정석
- 컨트렉트 동일한 함수이름 호출
- redux 기초
- 티스토리챌린지
- 스마트 컨트렉트 함수이름 중복
- ethers v6
- 스마트컨트렉트 예약어 함수이름 중복
- vue기초
- erc4337
- rust 기초
- ambiguous function description
- 머신러닝기초
- 러스트 기초 학습
- 러스트 기초
- cloud hsm
- ethers typescript
- cloud hsm 사용하기
- 계정추상화
- 러스트기초
- erc4337 contract
- ethers type
- Vue
- Today
- Total
체인의정석
라인해커톤 참여기2) 서버와 DB 연동하기 본문
1. 서버 접속정보는 env 파일로 빼두기

서버의 경우 local - dev -test - product 식으로 여러 단계로 분리해서 나누어서 관리해야한다. 물론 간단한 해커톤의 경우 그렇게 까지 나누지 않지만 특히 블록체인 프로젝트에서는 infura의 endpoint나 apikey 운영자의 wallet 프라이빗키 등을 그냥 두면 깃허브에 올릴때도 불편하기 때문에 git ignore에 env를 넣어주고 해당 파일 안에 접속정보 및 블록체인모듈에 필요한 정보들을 넣어둔다.

cross env를 넣어준다.
그리고 접속정보는 config 폴더 안에 CommonConfig를 두어서 공통설정값으로 넣어둔다.
블록체인을 쓴다면 해당 config도 추가해주어야 한다. 실제 프로젝트에서는 env파일을 통해 메인넷 테스트넷 관리자 키나 endpoint 등을 구분해주면 된다.
require('custom-env').env( true );

CommonConfig = {};

CommonConfig.Database = {
    host: process.env.DBHOST,
    port: process.env.DBPORT,
    user: process.env.DBUSER,
    password: process.env.DBPASS,
    waitForConnection: false,
    connectionLimit: 100,
    multipleStatements:true,
    timezone: '00:00'
};

CommonConfig.Blockchain={
    apikey: process.env.apikey,
    secret: process.env.secret,
    ownerWalletSecret: process.env.ownerWalletSecret,
    ownerWalletAddress: process.env.ownerWalletAddress,
    contractId: process.env.contractId
}

moduel.exports = CommonConfig;
2. 기존에 개발한 API를 config 값으로 바꾸어주고 모듈을 추가해준다.
const CommonConfig = dicontainer.get( "CommonConfig" );
const apikey = CommonConfig.blockchain.apikey;
const secret = CommonConfig.blockchain.secret;
const ownerWalletAddress = CommonConfig.blockchain.ownerWalletAddress;
const ownerWalletSecret = CommonConfig.blockchain.ownerWalletSecret;
const contractId = CommonConfig.blockchain.contractId;
이런식으로 넣어주면 설정값들을 env에서 가져와서 중요 정보들이 노출도 안되고 더 깔끔한 코드가 나오게 된다. diContainer는 여러개의 모듈이 동시에 실행되면 부하가 더 크기 때문에 부하를 줄이기 위하여서 하나의 모듈에서 여러모듈을 넣어놓고 가져다가 쓰는 구조를 만들기 위해 쓴다. (실장님이 만들어주셨다 난 아직 주니어 개발자 ㅎㅎㅎ)

실장님이 짜주신 항상 쓰는 모듈들 (미리 저장해놓았다가 재사용중이다. 물론 모듈중 블록체인 부분은 내가 구현하였다.) 모듈들도 프로젝트마다 업데이트 되는데 지금 상황에서는 저게 최신본이다. 물론 사용법과 원리는 다 물어봐서 알고 있다.

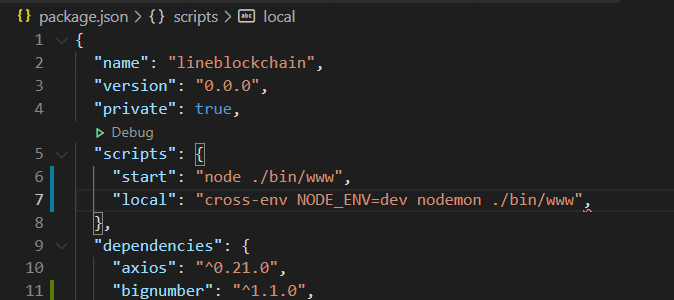
env를 쓸때는 pacakage.json에서 start 대신 dev 이런식으로 해주자.
이걸 깜빡해서 또 해맸다.
3. passport 바꿔서 로그인 설정
로그아웃은 route의 index.js에 있고,
passport.js는 지정된 폴더에서 보고 이해해서 바꾸어준다.
4. app.js 설정
dicontainer에 사용하는 모듈을 넣어준다.
//Module container
global.dicontainer = require( './module/diContainer' )();
dicontainer.register( "BigNumber", require( 'bignumber.js' ) );
dicontainer.register( "pathUtil", require( 'path' ) );
dicontainer.register( "crypto", require( 'crypto' ) );
dicontainer.factory( "CommonConfig", require( "./config/CommonConfig" ) );
dicontainer.factory( "Err", require( './module/error-handle' ) );
dicontainer.factory( "JSONResponse", require( "./module/JSON-Response" ) );
dicontainer.factory( "DB", require( './module/sql' ) );
개발일정이 촉박하여 나머지 부분은 나중에 정리하도록 하겠다.
'블록체인 > 퍼블릭 블록체인' 카테고리의 다른 글
| Solidity 코드 로컬환경 & Remix에서 배포하기 (0) | 2021.01.28 |
|---|---|
| erc20파일 노드에서 더 편하게 관리하는 법 npm @openaeppelin/contracts (0) | 2021.01.28 |
| Truffle 배포 후 web3에 abi인식 시키기 (1) | 2021.01.26 |
| 라인 블록체인 해커톤 01 - 데이터베이스 구축 및 배포 (0) | 2020.12.17 |
| 프로젝트 후기] GINI 프로젝트 - Klaytn, Ethereum (0) | 2020.12.08 |


