
| 일 | 월 | 화 | 수 | 목 | 금 | 토 |
|---|---|---|---|---|---|---|
| 1 | 2 | 3 | 4 | 5 | 6 | |
| 7 | 8 | 9 | 10 | 11 | 12 | 13 |
| 14 | 15 | 16 | 17 | 18 | 19 | 20 |
| 21 | 22 | 23 | 24 | 25 | 26 | 27 |
| 28 | 29 | 30 | 31 |
- 머신러닝기초
- ethers v6
- erc4337 contract
- 체인의정석
- vue기초
- ethers type
- 러스트 기초 학습
- 스마트컨트렉트 함수이름 중복 호출
- 오블완
- SBT표준
- rust 기초
- 컨트렉트 동일한 함수이름 호출
- git rebase
- ethers websocket
- 계정추상화
- redux 기초
- cloud hsm 서명
- ethers typescript
- cloud hsm
- erc4337
- 스마트컨트렉트 예약어 함수이름 중복
- Vue.js
- 러스트 기초
- redux toolkit 설명
- Vue
- 러스트기초
- 티스토리챌린지
- 스마트 컨트렉트 함수이름 중복
- cloud hsm 사용하기
- ambiguous function description
- Today
- Total
체인의정석
React 시작해보기 - Tic Tac Toe 튜토리얼 프로젝트로 기초 다져보기 본문
https://it-timehacker.tistory.com/439
React 시작해보기 - 튜토리얼 사이트에서 기초 특징 빠르게 익히기
그간 프론트 엔드를 사용할때는 그냥 ejs, html, bootstrap 등만 사용했었는데 이젠 프론트 엔드 프레임워크를 하나쯤은 써보고 싶었다. 몇년 전부터 미루고 미루다가 드디어 react를 시작해보기로 마
it-timehacker.tistory.com
지난 번에 기본적인 문법을 익혔으니 React를 간단하게 체험해 보기 위해서 tic tac toe를 한번 보려고 한다. 리액트 공식 홈페이지의 튜토리얼이다.
https://react.dev/learn/tutorial-tic-tac-toe
Tutorial: Tic-Tac-Toe – React
The library for web and native user interfaces
react.dev
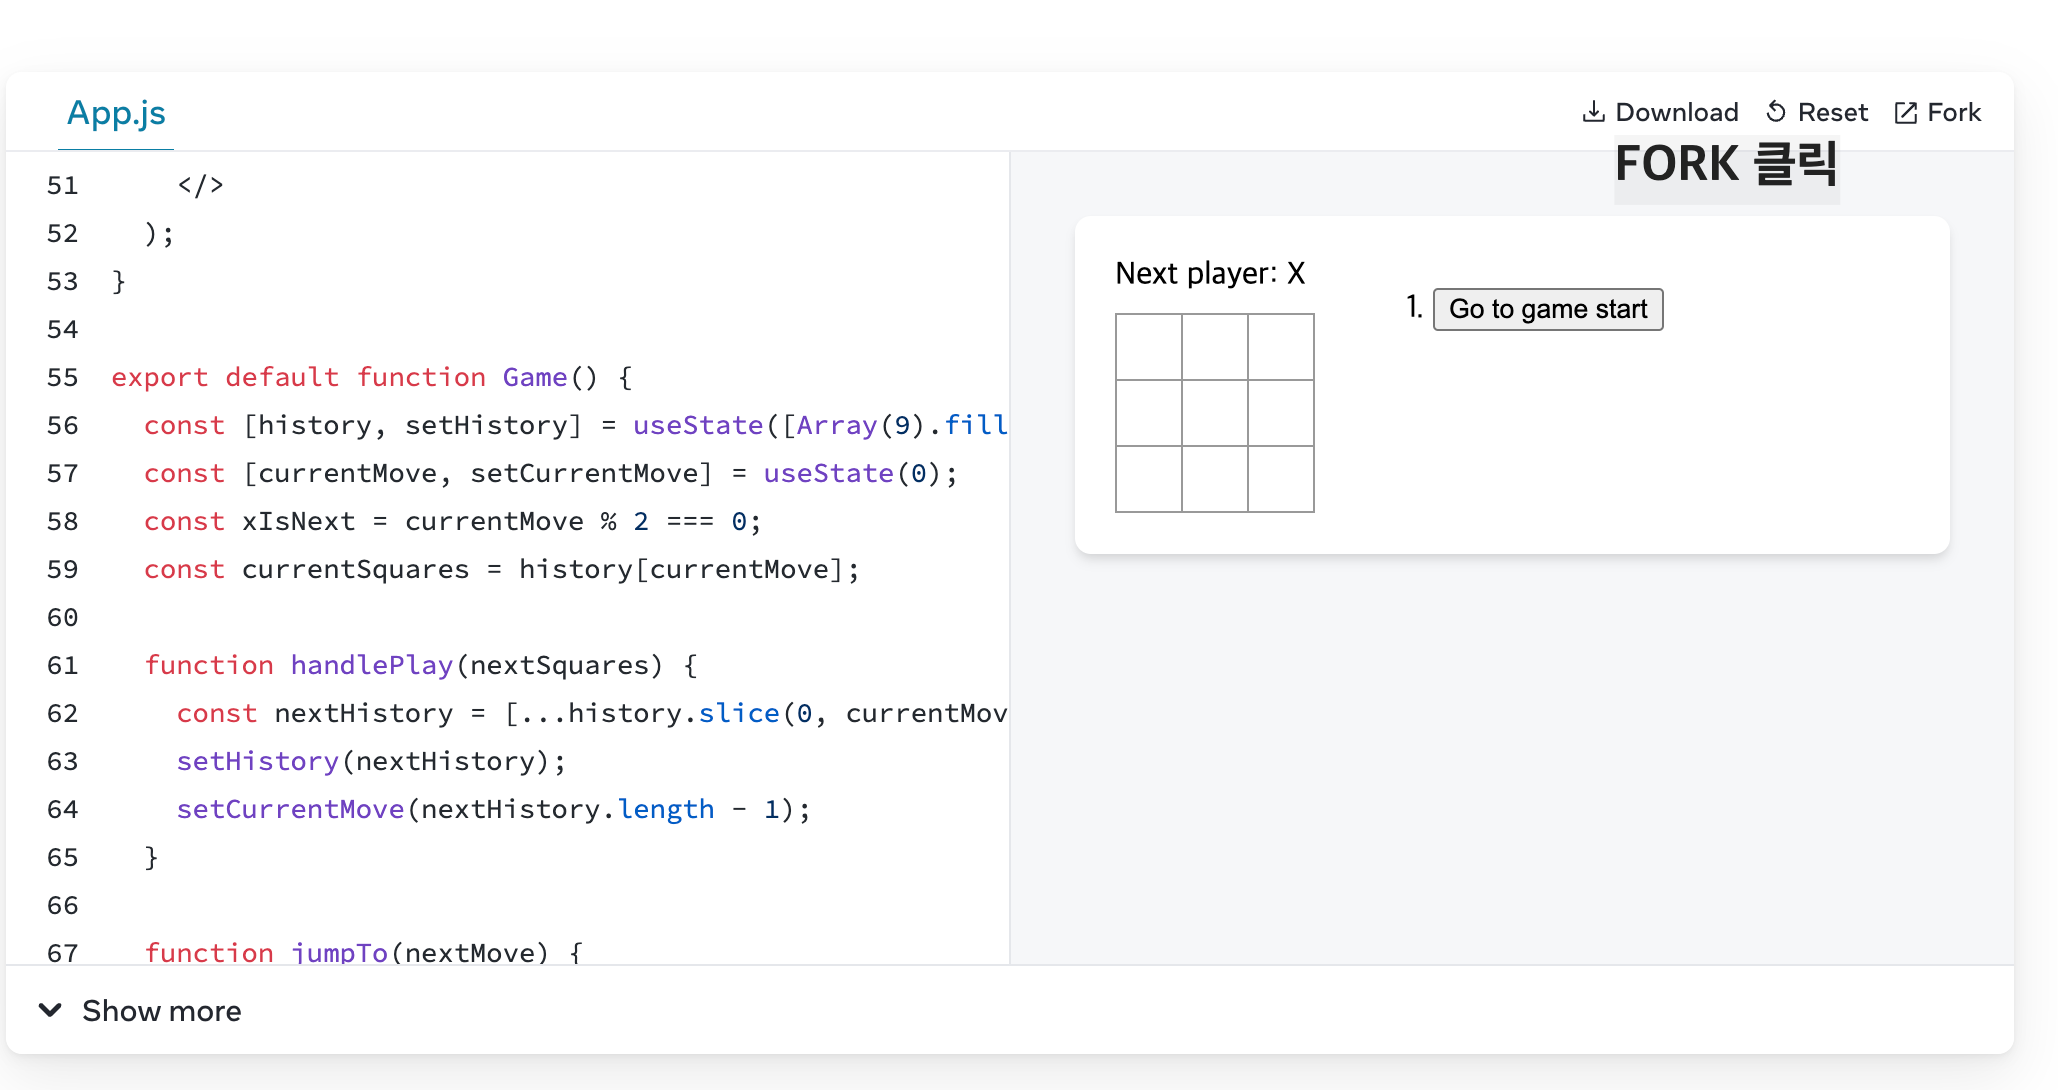
위에서 일단 fork를 클릭해 보자
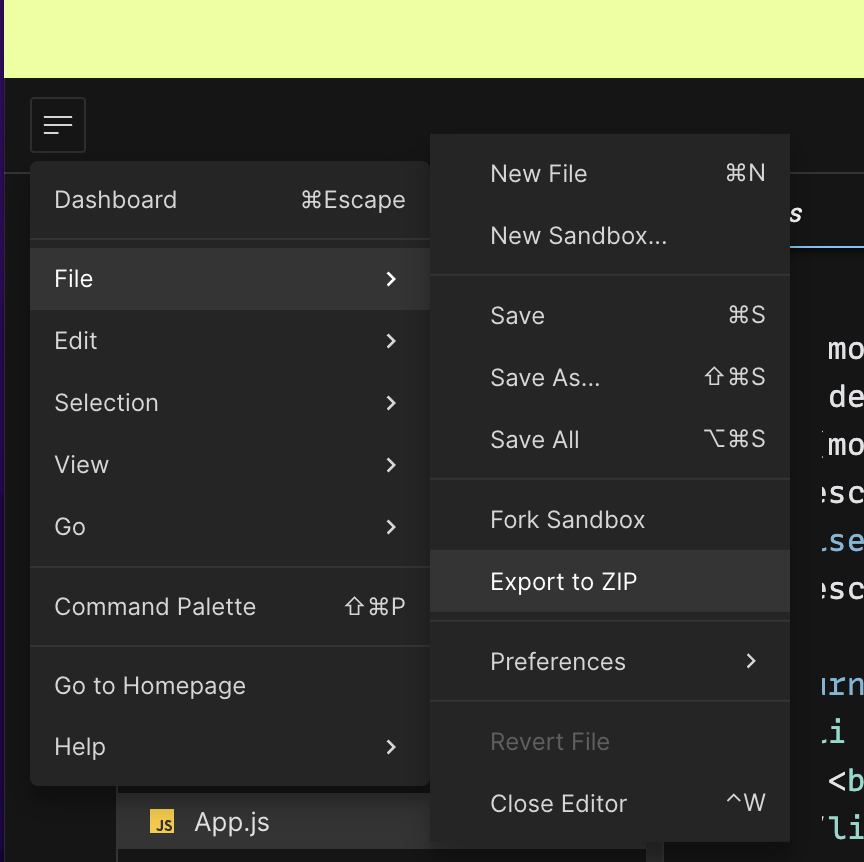
그리고 나오는 창에서 file -> export to ZIP을 누른다.
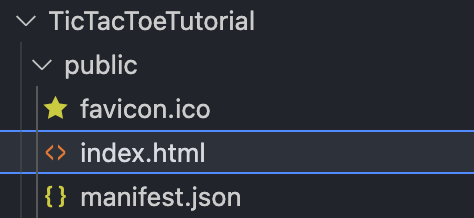
앞으로 react 관련 튜토리얼을 여기다가 올릴 예정이다. 나는 받은 압축 파일을 풀어서 여기있는 react tutorial 안의 틱택토 튜토리얼 폴더에 넣어 두었다.
https://github.com/hyunkicho/reactTutorial
GitHub - hyunkicho/reactTutorial
Contribute to hyunkicho/reactTutorial development by creating an account on GitHub.
github.com
그리고 npm install & npm run start 를 해준다.
근데 이걸 받으면 "./src/App.js Syntax error: Unexpected token " 에러가 나온다.
검색을 따로 해보니 아래 extension을 받으라는 글, 최신버전을 설치하라는 글, div를 태그안에 그냥 넣어주라는 글 등이 있었다.
https://marketplace.visualstudio.com/items?itemName=dsznajder.es7-react-js-snippets
ES7+ React/Redux/React-Native snippets - Visual Studio Marketplace
Extension for Visual Studio Code - Extensions for React, React-Native and Redux in JS/TS with ES7+ syntax. Customizable. Built-in integration with prettier.
marketplace.visualstudio.com
https://stackoverflow.com/questions/75368559/unexpected-token-at-of-a
Unexpected token at `>` of a `<>`
I'm trying to follow Tic-Tac-Toe tutorial on React in my local environment. However, when I run npm start, I get a syntax error around <>. How to reproduce In the middle of the tutorial, und...
stackoverflow.com
근데 다 해봐도 이상한거 같아서 그냥 챗 GPT에게 예제 기본 세팅을 만들어 달라고 했다.
0. 설치
npx create-react-app tic-tac-toe
cd tic-tac-toe
첫 프로젝트는 위의 명령어로 설치가 가능하다.
이렇게 설치하니 기본 세팅이 주어진 대로 쉽게 설치가 되었다.

그 뒤에는 알려준 대로 경로를 설정하니 정말 틱택토 게임이 실행이 되었다.
https://github.com/hyunkicho/reactTutorial/tree/main/tic-tac-toe
아무튼 이것과는 별개로 튜토리얼 문서를 한번 살펴 보려고 한다.
1. App.js
재사용 가능한 코드를 여기서는 컴포넌트라고 부르는데 App.js에서는 컴포넌트를 정의해 준다고 한다.
export default function Square() {
  return <button className="square">X</button>;
}
여기서 export는 외부에서 사용가능한 함수라는 의미이며 default의 의미는 파일의 메인 함수라는 의미라고 한다.
리턴하는 값은 JSX 형태인데 이건 html과 유사하다.
2. Index.js
import React, { StrictMode } from "react";
import { createRoot } from "react-dom/client";
import "./styles.css";

import App from "./App";

const root = createRoot(document.getElementById("root"));
root.render(
  <StrictMode>
    <App />
  </StrictMode>
);
스타일이나 APP에서 지정된 요소들은 모두 index.js에서 가져와서 사용한다.
App에서 지정된 컴포넌드들은 여기서 한번에 넘겨지는 것을 볼 수 있었다.
코드를 좀 더 살펴보니 package.json에서 main을 index.js 로 두고 있는 것을 볼 수 있었다.
{
  "dependencies": {
    "react": "^18.0.0",
    "react-dom": "^18.0.0",
    "react-scripts": "^5.0.0"
  },
  "main": "/index.js",
  "devDependencies": {
    "react-scripts": "1.0.0"
  },
  "name": "723948",
  "description": "",
  "version": "0.0.0",
  "scripts": {
    "start": "react-scripts start",
    "build": "react-scripts build",
    "test": "react-scripts test --env=jsdom",
    "eject": "react-scripts eject"
  }
}
3. 컴포넌트 만들어 보기
export default function Square() {
  return <button className="square">X</button><button className="square">X</button>;
}
이렇게 JSX 에서는 리턴을 해줄 때 한줄이 아니라면 에러가 나기 때문에
export default function Square() {
  return (
    <>
      <button className="square">X</button>
      <button className="square">X</button>
    </>
  );
}
일부러 <> </> 를 넣어주어서 한번에 리턴을 해주어야 한다고 한다.
이렇게 사각형을 모아서 보드 형태로 만드려면
export default function Board() {
  return (
    <>
      <div className="board-row">
        <button className="square">1</button>
        <button className="square">2</button>
        <button className="square">3</button>
      </div>
      <div className="board-row">
        <button className="square">4</button>
        <button className="square">5</button>
        <button className="square">6</button>
      </div>
      <div className="board-row">
        <button className="square">7</button>
        <button className="square">8</button>
        <button className="square">9</button>
      </div>
    </>
  );
}
이렇게 하면 된다고 한다.
.board-row:after {
  clear: both;
  content: '';
  display: table;
}
css를 보니까 display: table이라고 해두면 칸이 딱 한줄로 이쁘게 모이는 것 같다.
이걸 이제 넘기려면 Square를 그릴 때 아예 함수를 만들어서 JSX의 태그 안에 아래와 같이 넣어주면 된다.
이렇게 되면 보드를 넘길때 value를 넣어서 JSX가 만들어 지는 형태로 컴포넌트를 만들 수 있게 된다.
function Square({ value }) {
  return <button className="square">{value}</button>;
}

export default function Board() {
  return (
    <>
      <div className="board-row">
        <Square value="1" />
        <Square value="2" />
        <Square value="3" />
      </div>
      <div className="board-row">
        <Square value="4" />
        <Square value="5" />
        <Square value="6" />
      </div>
      <div className="board-row">
        <Square value="7" />
        <Square value="8" />
        <Square value="9" />
      </div>
    </>
  );
}
4. 반응형 컴포넌트 만들어 보기
import { useState } from 'react';

function Square() {
  const [value, setValue] = useState(null);

  function handleClick() {
    setValue('X');
  }

  return (
    <button
      className="square"
      onClick={handleClick}
    >
      {value}
    </button>
  );
}

export default function Board() {
  return (
    <>
      <div className="board-row">
        <Square />
        <Square />
        <Square />
      </div>
      <div className="board-row">
        <Square />
        <Square />
        <Square />
      </div>
      <div className="board-row">
        <Square />
        <Square />
        <Square />
      </div>
    </>
  );
}
이렇게 하면 handle Click을 통해 클릭시에 특정 값을 넘기는 행위를 할 수 있다고 한다.
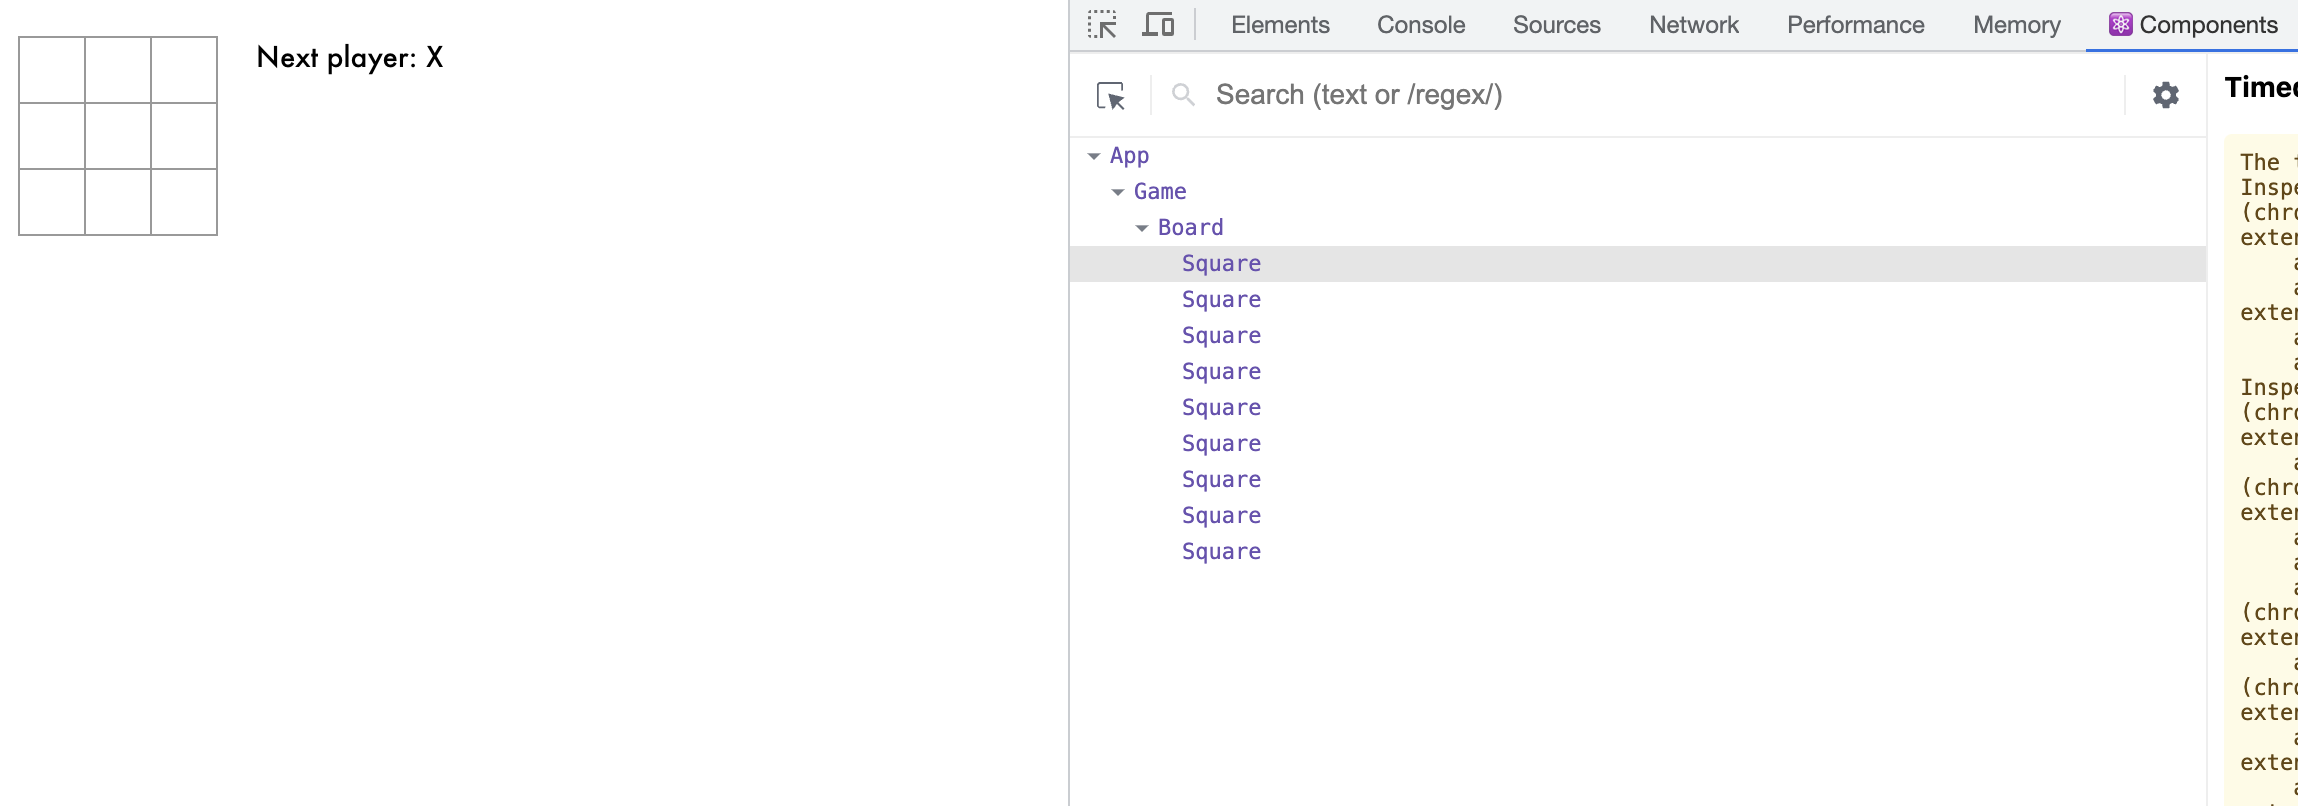
그리고 이 쯤 좋은 크롬 브라우져 익스텐션을 알려주는데
React Developer Tools
Adds React debugging tools to the Chrome Developer Tools. Created from revision 035a41c4e on 7/10/2023.
chrome.google.com
뭔가 필수 설치 모듈같이 보여서 설치했다.

개발자 도구에서 보면 다음과 같이 컴포넌트 들도 볼 수 있는 것을 확인할 수 있다.
5. 기본 틀 마무리 짓기
import { useState } from 'react';

function Square({ value }) {
  return <button className="square">{value}</button>;
}

export default function Board() {
  const [squares, setSquares] = useState(Array(9).fill(null));
  return (
    <>
      <div className="board-row">
        <Square value={squares[0]} />
        <Square value={squares[1]} />
        <Square value={squares[2]} />
      </div>
      <div className="board-row">
        <Square value={squares[3]} />
        <Square value={squares[4]} />
        <Square value={squares[5]} />
      </div>
      <div className="board-row">
        <Square value={squares[6]} />
        <Square value={squares[7]} />
        <Square value={squares[8]} />
      </div>
    </>
  );
}
다음과 같이 만들면 value라는 prop를 가져와서 Square라는 컴포넌트에 넘겨주고 이러한 컴포넌트들이 Board에서 쓰이는 구조를 취한다.
const [squares, setSquares] = useState(Array(9).fill(null));useState 함수가 여기서 사용되는데 null로 채워진 9개의 요소가 있는 배열이 만들어지게 되고 이를 squres라는 이름으로 정의하게 된다.
여기서 정의한 부분을 써서 뒤에서는 각각의 틱택토 칸에 배열안의 값 들이 채워지게 되는 것이다.
import { useState } from 'react';

function Square({ value, onSquareClick }) {
  return (
    <button className="square" onClick={onSquareClick}>
      {value}
    </button>
  );
}

export default function Board() {
  const [squares, setSquares] = useState(Array(9).fill(null));

  function handleClick(i) {
    const nextSquares = squares.slice();
    nextSquares[i] = 'X';
    setSquares(nextSquares);
  }

  return (
    <>
      <div className="board-row">
        <Square value={squares[0]} onSquareClick={() => handleClick(0)} />
        <Square value={squares[1]} onSquareClick={() => handleClick(1)} />
        <Square value={squares[2]} onSquareClick={() => handleClick(2)} />
      </div>
      <div className="board-row">
        <Square value={squares[3]} onSquareClick={() => handleClick(3)} />
        <Square value={squares[4]} onSquareClick={() => handleClick(4)} />
        <Square value={squares[5]} onSquareClick={() => handleClick(5)} />
      </div>
      <div className="board-row">
        <Square value={squares[6]} onSquareClick={() => handleClick(6)} />
        <Square value={squares[7]} onSquareClick={() => handleClick(7)} />
        <Square value={squares[8]} onSquareClick={() => handleClick(8)} />
      </div>
    </>
  );
}
그 다음은 해당 코드가 나오게 되는데 이를 살펴보자면
<button className="square" onClick={onSquareClick}>squre 컴포넌트 클릭 시에 onSquareClick 이 실행이 되게 되고
function Square({ value, onSquareClick }) {이걸 실행시키기 위해서 Square 함수에서 onSqureClick을 받아오게 된다.
<Square value={squares[0]} onSquareClick={handleClick} />실제로 Squre 컴포넌트에서 불릴 때는 이걸 handleClick 이라는 이름으로 부르게 되고
  function handleClick() {
    const nextSquares = squares.slice();
    nextSquares[0] = "X";
    setSquares(nextSquares);
  }
그럼 이걸 부를 때 실행하는 함수를 정의해 주어야 하니 정의를 위와 같이 해주게 되는데 squares 배열의 값을 가져와서 하나씩 가져오는 기능이다.
https://developer.mozilla.org/en-US/docs/Web/JavaScript/Reference/Global_Objects/Array/slice
Array.prototype.slice() - JavaScript | MDN
The slice() method returns a shallow copy of a portion of an array into a new array object selected from start to end (end not included) where start and end represent the index of items in that array. The original array will not be modified.
developer.mozilla.org
array.slice()를 하면 전체 배열 요소들이 복사가 되게 되는데 여기서 [0] 번을 X로 바꿔버리고 그걸 set 시켜 버리는 것이다.
  function handleClick(i) {
    const nextSquares = squares.slice();
    nextSquares[i] = "X";
    setSquares(nextSquares);
  }
여기서 틱텍토의 칸 위치를 나타내는 i 를 받아서 X를 표시해주기 때문에
slice는 매번 배열을 복사하지만 i 번째 값을 가져와서 X로 바꿔버리고 setSquare를 해버리기 때문에 square가 복사되어 변경된 형태로 다시 set이 되어 업데이트가 되게 된다.
export default function Board() {
  // ...
  return (
    <>
      <div className="board-row">
        <Square value={squares[0]} onSquareClick={() => handleClick(0)} />
        <Square value={squares[1]} onSquareClick={() => handleClick(1)} />
        <Square value={squares[2]} onSquareClick={() => handleClick(2)} />
      </div>
      <div className="board-row">
        <Square value={squares[3]} onSquareClick={() => handleClick(3)} />
        <Square value={squares[4]} onSquareClick={() => handleClick(4)} />
        <Square value={squares[5]} onSquareClick={() => handleClick(5)} />
      </div>
      <div className="board-row">
        <Square value={squares[6]} onSquareClick={() => handleClick(6)} />
        <Square value={squares[7]} onSquareClick={() => handleClick(7)} />
        <Square value={squares[8]} onSquareClick={() => handleClick(8)} />
      </div>
    </>
  );
};
이렇게 바뀐 handleClick의 경우 onSquareClick 이 실행될 때마다 호출되어야 하므로 여기서는 화살표 함수를 통해 onSquareClick을 더 간결하게 만든다.
그리고 위에서 우리는 slice()를 통해서 복사를 했는데 여기에 대한 장점도 튜토리얼 페이지에 나와있다.
크게 2개의 장점을 가지는데
1. 복사를 통해서 만들면 이전의 내역들을 모두 저장해두었다가 되돌리기와 같이 이전 내역을 사용할 수 있다.
2. 부모 자식 관계 형태가 되어서 전체가 상태변화를 하는 것이 아니라 부분 마다 상태변화가 되어서 리소스가 절감된다.
이렇게 두고 보니 원본은 그대로 두고 복사를 해서 각 컴포넌트에 주는 구조의 장점에 대해서 이해할 수 있었다.
6. 턴 마다 X 또는 O 표시하기
이제 다음과 같이 코드를 수정해서 xIsNext 라는 변수를 정의해서 상태관리를 할 것이다.
setXIsNext를 통해서 한 턴이 끝날 때 !를 통해 플레이어가 바뀌는 것을 체크하고
이후 if, else 문을 추가해서 X 나 O를 상황에 맞게 표시해 주게 된다.
import { useState } from 'react';

function Square({value, onSquareClick}) {
  return (
    <button className="square" onClick={onSquareClick}>
      {value}
    </button>
  );
}

export default function Board() {
  const [xIsNext, setXIsNext] = useState(true);
  const [squares, setSquares] = useState(Array(9).fill(null));

  function handleClick(i) {
    if (squares[i]) {
      return;
    }
    const nextSquares = squares.slice();
    if (xIsNext) {
      nextSquares[i] = 'X';
    } else {
      nextSquares[i] = 'O';
    }
    setSquares(nextSquares);
    setXIsNext(!xIsNext);
  }

  return (
    <>
      <div className="board-row">
        <Square value={squares[0]} onSquareClick={() => handleClick(0)} />
        <Square value={squares[1]} onSquareClick={() => handleClick(1)} />
        <Square value={squares[2]} onSquareClick={() => handleClick(2)} />
      </div>
      <div className="board-row">
        <Square value={squares[3]} onSquareClick={() => handleClick(3)} />
        <Square value={squares[4]} onSquareClick={() => handleClick(4)} />
        <Square value={squares[5]} onSquareClick={() => handleClick(5)} />
      </div>
      <div className="board-row">
        <Square value={squares[6]} onSquareClick={() => handleClick(6)} />
        <Square value={squares[7]} onSquareClick={() => handleClick(7)} />
        <Square value={squares[8]} onSquareClick={() => handleClick(8)} />
      </div>
    </>
  );
}
7. 우승자 뽑아내기
우승자를 뽑아내는 로직은 좀 간단했는데 이기는 종류의 데이터를 모두 line 안에 넣어둔 후에
line안에 있는 값이 모두 있는지 체크해서 있다면 우승자로 뽑아버리는 것이였다.
function calculateWinner(squares) {
  const lines = [
    [0, 1, 2],
    [3, 4, 5],
    [6, 7, 8],
    [0, 3, 6],
    [1, 4, 7],
    [2, 5, 8],
    [0, 4, 8],
    [2, 4, 6]
  ];
  for (let i = 0; i < lines.length; i++) {
    const [a, b, c] = lines[i];
    if (squares[a] && squares[a] === squares[b] && squares[a] === squares[c]) {
      return squares[a];
    }
  }
  return null;
}
그리고 해당 함수는 조건절로 나누어서 winner가 있으면 끝내고 없다면 다음 플레이어를 찾는식으로 코딩하였다.
  const winner = calculateWinner(squares);
  let status;
  if (winner) {
    status = 'Winner: ' + winner;
  } else {
    status = 'Next player: ' + (xIsNext ? 'X' : 'O');
  }
이 결과 나온 코드는 다음과 같다.
import { useState } from 'react';

function Square({value, onSquareClick}) {
  return (
    <button className="square" onClick={onSquareClick}>
      {value}
    </button>
  );
}

export default function Board() {
  const [xIsNext, setXIsNext] = useState(true);
  const [squares, setSquares] = useState(Array(9).fill(null));

  function handleClick(i) {
    if (calculateWinner(squares) || squares[i]) {
      return;
    }
    const nextSquares = squares.slice();
    if (xIsNext) {
      nextSquares[i] = 'X';
    } else {
      nextSquares[i] = 'O';
    }
    setSquares(nextSquares);
    setXIsNext(!xIsNext);
  }

  const winner = calculateWinner(squares);
  let status;
  if (winner) {
    status = 'Winner: ' + winner;
  } else {
    status = 'Next player: ' + (xIsNext ? 'X' : 'O');
  }

  return (
    <>
      <div className="status">{status}</div>
      <div className="board-row">
        <Square value={squares[0]} onSquareClick={() => handleClick(0)} />
        <Square value={squares[1]} onSquareClick={() => handleClick(1)} />
        <Square value={squares[2]} onSquareClick={() => handleClick(2)} />
      </div>
      <div className="board-row">
        <Square value={squares[3]} onSquareClick={() => handleClick(3)} />
        <Square value={squares[4]} onSquareClick={() => handleClick(4)} />
        <Square value={squares[5]} onSquareClick={() => handleClick(5)} />
      </div>
      <div className="board-row">
        <Square value={squares[6]} onSquareClick={() => handleClick(6)} />
        <Square value={squares[7]} onSquareClick={() => handleClick(7)} />
        <Square value={squares[8]} onSquareClick={() => handleClick(8)} />
      </div>
    </>
  );
}

function calculateWinner(squares) {
  const lines = [
    [0, 1, 2],
    [3, 4, 5],
    [6, 7, 8],
    [0, 3, 6],
    [1, 4, 7],
    [2, 5, 8],
    [0, 4, 8],
    [2, 4, 6],
  ];
  for (let i = 0; i < lines.length; i++) {
    const [a, b, c] = lines[i];
    if (squares[a] && squares[a] === squares[b] && squares[a] === squares[c]) {
      return squares[a];
    }
  }
  return null;
}
여기까지 해서 기본적인 틱택토 튜토리얼을 만들어 봤다.
튜토리얼에는 이걸 뒤로 복기 시키는 기능까지 있었는데 어느정도 기초는 잡은것 같아 이 부분은 일단은 생략하고 추후 할 지 말지 고민해볼 예정이다.
8. 깃허브 코드 살펴보기
그럼 챗GPT가 만들어준 기본 코드를 한번 살펴보겠다.
일단 챗 GPT는 각 클래스를 나눠서 컴포넌트 구조를 더 깔끔하게 가져갔다.

먼저 Square를 보자면
import React from "react";

function Square(props) {
  return (
    <button className="square" onClick={props.onClick}>
      {props.value}
    </button>
  );
}

export default Square;
함수 하나를 하나의 파일로 뽑아낸 정도의 차이만 보이며 props라는 입력값을 받고 여기서 onClick과 value 2개로 각각 받아와서 사용중인 것을 볼 수 있었다.
다음 Square를 가져온 Board를 보자면
import React from "react";
import Square from "./Square";

class Board extends React.Component {
  renderSquare(i) {
    return (
      <Square
        value={this.props.squares[i]}
        onClick={() => this.props.onClick(i)}
      />
    );
  }

  render() {
    return (
      <div>
        <div className="board-row">
          {this.renderSquare(0)}
          {this.renderSquare(1)}
          {this.renderSquare(2)}
        </div>
        <div className="board-row">
          {this.renderSquare(3)}
          {this.renderSquare(4)}
          {this.renderSquare(5)}
        </div>
        <div className="board-row">
          {this.renderSquare(6)}
          {this.renderSquare(7)}
          {this.renderSquare(8)}
        </div>
      </div>
    );
  }
}

export default Board;
먼저 보드를 만드는 부분은 Board 클래스를 만든 후에 renderSquare라는 함수를 통해서 더 간결하게 가져와서 컴포넌트를 랜더링 해주고 있다 나머지 부분은 동일하다.
그리고 props. 을 사용해서 객체 형태로 바로 넘겨주어서 입력값이 조금 더 깔끔했다.
import React from "react";
import Board from "./Board";

class Game extends React.Component {
  constructor(props) {
    super(props);
    this.state = {
      history: [
        {
          squares: Array(9).fill(null)
        }
      ],
      stepNumber: 0,
      xIsNext: true
    };
  }

  handleClick(i) {
    const history = this.state.history.slice(0, this.state.stepNumber + 1);
    const current = history[history.length - 1];
    const squares = current.squares.slice();
    if (calculateWinner(squares) || squares[i]) {
      return;
    }
    squares[i] = this.state.xIsNext ? "X" : "O";
    this.setState({
      history: history.concat([
        {
          squares: squares
        }
      ]),
      stepNumber: history.length,
      xIsNext: !this.state.xIsNext
    });
  }

  render() {
    const history = this.state.history;
    const current = history[this.state.stepNumber];
    const winner = calculateWinner(current.squares);

    let status;
    if (winner) {
      status = "Winner: " + winner;
    } else {
      status = "Next player: " + (this.state.xIsNext ? "X" : "O");
    }

    return (
      <div className="game">
        <div className="game-board">
          <Board
            squares={current.squares}
            onClick={i => this.handleClick(i)}
          />
        </div>
        <div className="game-info">
          <div>{status}</div>
        </div>
      </div>
    );
  }
}

function calculateWinner(squares) {
  const lines = [
    [0, 1, 2],
    [3, 4, 5],
    [6, 7, 8],
    [0, 3, 6],
    [1, 4, 7],
    [2, 5, 8],
    [0, 4, 8],
    [2, 4, 6]
  ];
  for (let i = 0; i < lines.length; i++) {
    const [a, b, c] = lines[i];
    if (squares[a] && squares[a] === squares[b] && squares[a] === squares[c]) {
      return squares[a];
    }
  }
  return null;
}

export default Game;
마지막으로 game 부분인데 여기서도 우승자를 산출하는 부분은 동일하게 들어갔다.
'개발 > frontend' 카테고리의 다른 글
| Metamask + Next.js 적용해서 프론트 페이지 만들어보기 (0) | 2024.06.13 |
|---|---|
| 텔레그램 봇 기본 틀 만들어 보기 (기본 템플릿, 깃허브 소스코드 및 사용방법 포함, javascript & typescript) (0) | 2023.07.29 |
| React 시작해보기 - 튜토리얼 사이트에서 기초 특징 빠르게 익히기 (0) | 2023.07.15 |
| html 웹 서버로 명령어 한번에 띄우기 http-server (0) | 2023.06.10 |
| 남이 만든 CSS 수정하기 (0) | 2021.08.06 |

